Intro
So now that you've got an idea for a product. it's time to setup a landing page, and collect leads so you can later email them when you're ready to launch.
There are a few services out there that make it easy to setup a landing page. those services might be paid, free but limited in some way, or free but co-branded.
But we're not going to use any of those. this post is mainly for anyone who knows how to code, and wants to setup a fully custom landing page, and wants full control of everything. You'll be able to change how everything works to customise it for your needs.
Best of all, building all of this should cost you exactly £0 to host and run, because we'll be operating within the free tier of these services.
We're going to be using these services to wire everything up:
- gatsby.js - a fast static site generator, gives you total control over how you style/theme your landing page. It uses React which means you can build out fairly advanced user interfaces easily. open source - $0
- netlify - no need to run your own servers, you can simply push your changes to github, and netlify will build and deploy your site. free plan - $0
- aws lambda - this will allow us to add our lead's email address to our email marketing list . first 1M requests free
- serverless - makes working with aws lambda easier. open source
- EmailOctopus - the email marketing service we'll use to store our subscribers, and send a welcome email when someone gives us their information free plan
Setup a new gatsby project
This assumes you've already got node and npm installed. You'll need to run this command to install the gatsby cli tool:
npm install --global gatsby-clionce installed, use git to clone the example landing page project from github.com
git clone git@github.com:sanjeevan/example-landing-page.gitChange into the example-landing-page folder and start the development server that runs at http://localhost:8000:
cd example-landing-page
gatsby develop
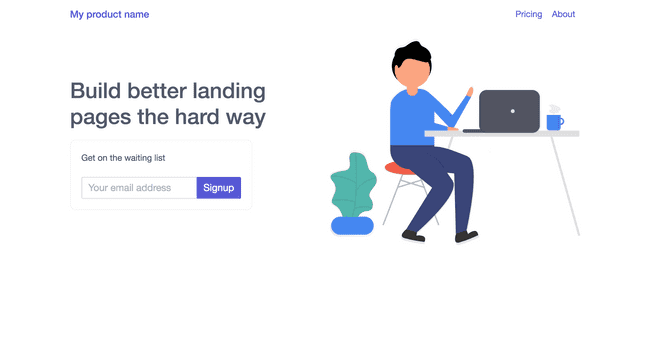
Now if you go to http://localhost:8000 you'll see the simple landing page with a basic email lead capture form.
Customising your landing page
Ok, now you've got the site running on your local machine, you can now start customising it. The first page you'll want to look at is the index page.
Open src/pages/index.js in your editor:
import React from 'react'
import Link from 'gatsby-link'
import Signup from '../components/signup'
import heroImage from '../assets/hero.svg'

const IndexPage = () => (
  <div className="container">
    <div className="columns">
      <div className="column col-6">
        <div className="hero">
          <div>
            <h1>Build better landing pages the hard way</h1>
            <Signup />
          </div>
        </div>
      </div>
      <div className="column col-6">
        <img className="hero-image" src={heroImage} />
      </div>
    </div>
  </div>
)

export default IndexPage
This page uses a basic two column layout, with the signup from on the left and the image on the right. if you want to change the layout, this is the place to do it.
This index page is contained inside a layout file, which can be found in
src/layouts/index.js:
import React from 'react'
import PropTypes from 'prop-types'
import Helmet from 'react-helmet'

import Header from '../components/header'
import 'spectre.css'
import './index.css'

const Layout = ({ children, data }) => (
  <div>
    <Helmet
      title={data.site.siteMetadata.title}
      meta={[
        { name: 'description', content: 'Sample' },
        { name: 'keywords', content: 'sample, something' },
      ]}
    />
    <div className="header-container">
      <Header siteTitle={data.site.siteMetadata.title} />
    </div>
    <div className="page-container">
      {children()}
    </div>
  </div>
)

Layout.propTypes = {
  children: PropTypes.func,
}

export default Layout

export const query = graphql`
  query SiteTitleQuery {
    site {
      siteMetadata {
        title
      }
    }
  }
`
The layout file is where you can set metadata, and include your custom css files as shown at the top of the file.
This project uses spectre.css for the
css framework (import 'spectre.css), it's super lightweight and easy to work with. it also uses a
custom stylesheet (import 'index.css') which is located in src/layouts/index.css. If
you want to add custom css, this is where you would do it.
Since this project uses React, the email capture form is a separate React
component, which can be found in src/components/signup.js:
import React from 'react'
import styles from './signup.module.css'
import { push } from 'gatsby-link'
import { createSubscriber } from '../services'
import className from 'classnames'

export default class Signup extends React.Component {

  state = {
    email: '',
    error: null,
    loading: false,
  }

  validateEmail = email => {
      var re = /^(([^<>()\[\]\\.,;:\s@"]+(\.[^<>()\[\]\\.,;:\s@"]+)*)|(".+"))@((\[[0-9]{1,3}\.[0-9]{1,3}\.[0-9]{1,3}\.[0-9]{1,3}\])|(([a-zA-Z\-0-9]+\.)+[a-zA-Z]{2,}))$/;
      return re.test(String(email).toLowerCase());
  }

  handleEmailChange = evt => {
    this.setState({ email: evt.target.value, error: null })
  }

  handleSignup = evt => {
    evt.preventDefault()

    if (this.state.email == '') {
      return
    }

    if (!this.validateEmail(this.state.email)) {
      this.setState({ error: 'That doesn\'t look like a valid email address' })
      return
    }

    this.setState({ loading: true })

    createSubscriber(this.state.email).then(data => {
      if (!data.metadata.success) {
        this.setState({ error: data.metadata.message, loading: false })
        return
      } else {
        push('/signup-success')
      }
    })
  }

  render() {
    let btnClass = className('btn', 'btn-primary', 'input-group-btn', 'btn-lg', {
      'loading': this.state.loading
    })
    let groupClass = className('form-group', {
      'has-error': this.state.error
    })

    return (
      <div className={styles.root}>
        <p>Get on the waiting list</p>
        <div className={groupClass}>
          <div className="input-group">
            <input className="form-input input-lg" placeholder="Your email address" type="text" value={this.state.email} onChange={this.handleEmailChange} />
            <button className={btnClass} type="button" onClick={this.handleSignup}>Signup</button>
          </div>
          { this.state.error ? <p className="form-input-hint">{this.state.error}</p> : null }
        </div>
      </div>
    )
  }
}
This form:
- asks for an email address
- validates that the value is not empty, and that it looks like an email address using regex
- POSTs the data to our AWS lambda function (explained later)
- shows a spinner while this is happening
- forwards to the
signup-successpage if there were no errors
If you want to customise the signup form, you can do it here, the css for this
compnent is also located in the same folder as signup.module.css
Uploading your project to netlify
Netlify will automatically build your project and publish it to a subdomain everytime
you push changes to your github repo. This makes deployment very easy, as it's
just a simple git push command.
The first step is to create a new repo on github, this should be fairly
straightforward. Then using the standard git push command, push your project
up to the repo.
Now create a new account on Netlify and setup a new project, you'll then be prompted to connect your Github account which you should do, and then select the repo that you've just pushed your changes to.
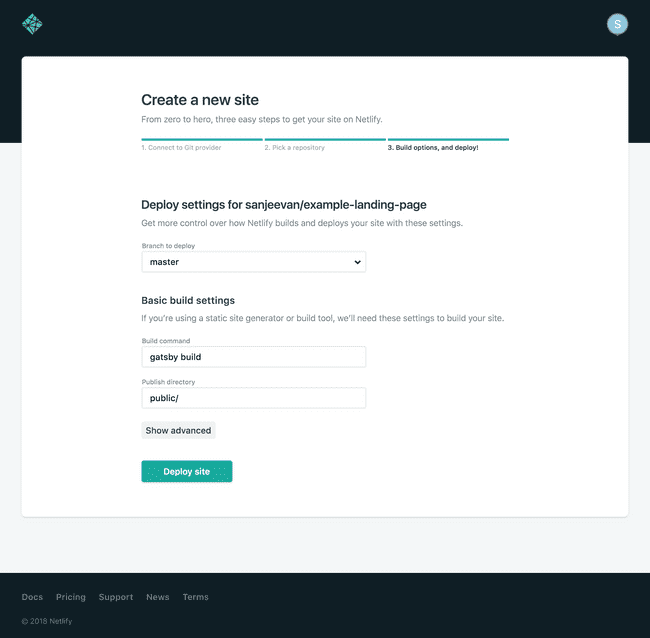
Once you've selected the repo, you should see the screen below:
The important settings here is that the build command should be gatsby build
and the public directory should be public/
Now press the deploy site button and your landing page will be deployed to a
random subdomain on netlify after it has been built.
If you want to host the site on a custom domain that you own, you can go to the domain management settings on Netlify, and add a custom domain. You'll need to update the dns for your domain to point to netlify servers. This should be straightforward to do, just follow the instructions in the domain management section.
Setting up aws lambda
As you make have noticed, when you click the signup button nothing will happen, this is because we'll need to setup an API endpoint that will recieve the email address and add it to our email marketing list.
To do this we can use the serverless framework to create an AWS lambda function that will be triggered by AWS API gateway. The lambda function will recieve the email address that was submitted to the signup form, and it'll add it to a email list in EmailOctopus.
First install the serverless framework:
npm install -g serverlessOnce installed you'll have access to the serverless cli tool, for full docs on how to use this tool, see the serverless documentation
Now clone the example serverless project:
git clone git@github.com:sanjeevan/example-landing-page-lambda.gitIf you don't already have an AWS account, you can create one for free, once that's done you'll need to generate api keys for your account. This gives the serverless cli tool access to your aws account to setup the api gateway and the lambda function for you.
To get api keys to connect to your aws account, use the following steps:
- login to your Amazon Web Services Account and go to the Identity & Access Management (IAM) page.
- click on "users" and then "add user".
- set a name for this user (e.g.
serverless-user) and enable programmatic access, then click next. - click on attached existing policies directly, and search for AdministratorAccess and check it.
- click next and review that everything looks good
- finally click on create user
- you'll be given the api key and secret, copy those to a safe place
Now that you've got your access keys, export them as environment variables:
export AWS_ACCESS_KEY_ID=<your-key-here>
export AWS_SECRET_ACCESS_KEY=<your-secret-key-here>
The other environment variable you'll have to export is the EmailOctopus api key. You'll be able to find this in the api section of the EmailOctopus site. Like before export this to your environment:
export EMAIL_OCTOPUS_API_KEY=<api-key-here>The serverless.yml config will inject this variable into the aws lambda function's
environment. let's take a look at the relevant part of the file:
functions:
  createSubscriber:
    handler: handler.createSubscriber
    events:
      - http:
          path: subscriber/create
          method: post
          cors: true
    environment:
      API_KEY: ${env:EMAIL_OCTOPUS_API_KEY}
The above config tells serverless to provision:
- a new lambda function called
createSubscriber - the handler for this function is
handler.createSubscriber(path to file + method name) - it only accepts http events from aws api gateway
- it only accepts POST requests on the path
subscriber/create - it supports CORS, we'll need this as our landing page will be on a different domain from our api
API_KEYwill be set for the lambda function using your machine'sEMAIL_OCTOPUS_API_KEYenvironment variable
Once you've set all the environment variables, lets deploy the function:
serverless deployYou should see output similar to:
Serverless: Packaging service...
Serverless: Excluding development dependencies...
Serverless: Uploading CloudFormation file to S3...
Serverless: Uploading artifacts...
Serverless: Uploading service .zip file to S3 (49.05 KB)...
Serverless: Validating template...
Serverless: Updating Stack...
Serverless: Checking Stack update progress...
..........
Serverless: Stack update finished...
Service Information
service: landing-page-lambda
stage: dev
region: us-east-1
stack: landing-page-lambda-dev
api keys:
  None
endpoints:
  POST - https://d3nswixnfg.execute-api.us-east-1.amazonaws.com/dev/subscriber/create
functions:
  createSubscriber: landing-page-lambda-dev-createSubscriber
Serverless: Removing old service artifacts from S3...
Looking at the log, you'll notice that a new API has been created for your lambda function at:
https://d3nswixnfg.execute-api.us-east-1.amazonaws.com/dev/subscriber/createThis api endpoint expects a POST request, with a JSON encoded body. the lambda
function parses the JSON body of the POST request and extracts the email and
listId parameter. the expected format of the JSON request:
{
    "email": "santa@northpole.com",
    "listId": "1234-1245-1345-4325"
}
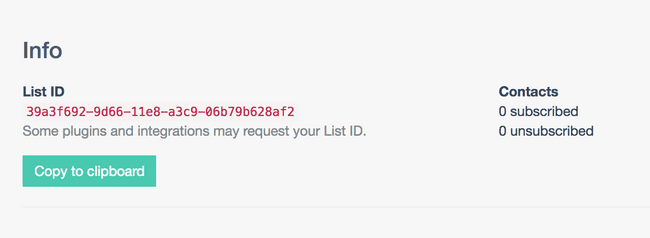
The listId value if the ID of the email list on EmailOctopus. you'll be able
to find the ID by going to the settings -> info tab of your list on
emailoctopus:
Now that we now where the api endpoint is for the lambda function, let's update our landing page so that it'll post data to this endpoint.
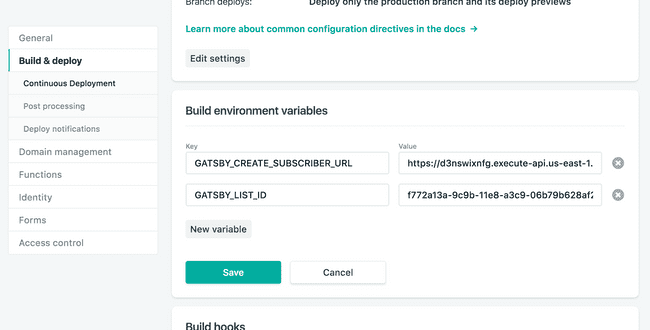
To do this go to the netlify settings page for your site, then do to the build and deploy section, you should see a build environment variables section. Add two new variables there:
- GATSBY_CREATE_SUBSCRIBER_URL - The AWS API endpoint that serverless generated for you
- GATSBY_LIST_ID - The EmailOctopus list ID
Once you've set the environment variables, you'll need to redeploy the site. You can do this by going to the deploys page of your netlify site and click on the trigger deploy button.
This will force Netlify to rebuild the site with the new environment variables. once the site has been published, emails submitted via the signup form will be sent to the lambda function which will add it to the EmailOctopus list.
The end
You've now setup a fairly robust website that is fully customisable. If you want to add more pages, or more complex components - you can!
Now that you have a solid base to work with, you can build out features like:
- send a message to a slack channel when someone signs up
- send the user's email address to a CRM system
- create a waiting list page where you can show the user their position in the queue
- use mailchimp or any other email marketing software instead of email octopus
- collect more details about the user in the
Signupreact component


